Good coding practices- Version control with git
For this week’s good coding practices, the focus is on maintaining and keeping track of changes to your software as it evolves, also known as version control. As you may have already discovered on your own, the process of writing software is one of write and revise, write and revise, repeat. As our software becomes more complex, it becomes easier to make changes to our code that cause unexpected issues, in many cases without being aware that we’ve even introduced such issues. Being able to go back and look at a previous version of our software so that we can fix such issues is paramount.
Additionally, when we work collaboratively on a project, it is important to have a robust system that keeps track of the changes that others make to software that is used by the group. Otherwise it is difficult to know what changes were made and easy to make mistakes like overwrite updates to the code! Simply put, keeping track of the changes that we make ourselves or those that others make is an important part of programming efficiently and effectively.
Git
As software development practices have evolved, so have version control systems (VCS). One of the most popular VCSs today is called git. Git handles tracking changes made to files in a simple way, without necessitating additional software to be installed to each of your projects. Git handles all this by essentially taking a snapshot of your entire project each time you commit a change. In this way, a git “commit” (an individual snapshot) acts kind of like a miniature file system. This means that there are some really useful tools that make developing software very efficient and safe, making it difficult to destroy or lose code.
If you have completed some of the previous exercises in this course, you have used git without really doing anything other than pressing an upload button or two. Now we will learn to use git as part of our normal workflow as part of working with Anaconda.
Installation using a terminal
Mac users: Although it will work, you don’t need to start Anaconda to complete the next step. Instead, open the Terminal application and skip to Installing Git. You can choose to use Mac’s own Terminal or Anaconda’s.
Windows users: There are a couple of different options here depending on how your computer is setup. First, start Anaconda up as you normally would, but don’t start a Spyder session. Instead, once the Navigator is open, you should see an option for the Anaconda Powershell or Powershell Prompt (using the CMD Prompt should also work). If you don’t see these options, you may need to update Anaconda. Go ahead and open the Powershell Prompt.
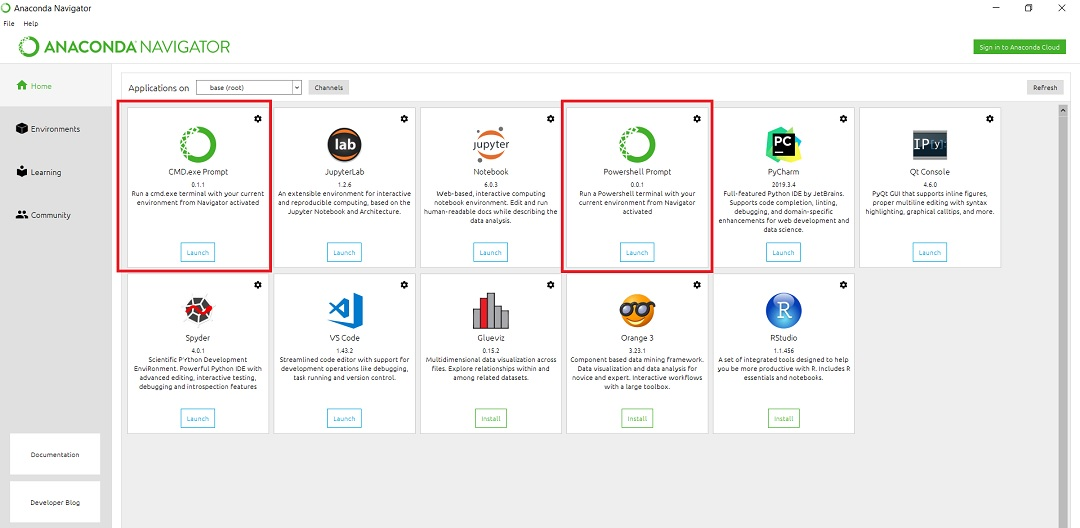
The Anaconda Navigator
This will start a terminal session which we can use to install and then use git.
Installing Git
The terminal will behave differently depending if you are on a Windows computer or a Mac, but the command that we will use to install git is the same regardless. In the terminal enter the following command:
conda install -c anaconda git
You will probably be told that various things need updating, and then prompted to enter whether to proceed or not. Enter ‘y’ and git (and some other updates) will be installed.
One common error on Windows that you might see when executing this command is something about permissions. If you get this error you may need to run “Anaconda Powershell as an Administrator”.
Warning
If you are having issues installing git .. or working with the Powershell or the Terminal (or anything else), please let me know so we can talk about it and fix the issue. I would like you to use git as outlined in this lesson for the rest of the course, so let’s make sure things are setup correctly now! .. There is a lot .. you can do with a terminal but we aren’t covering any of that in this course (wait until .. Phy380), but I do want you to use it to work with git and github.
Using git
In this course, we will use git to
Clone (download) code from your remote repositories on GitHub.
Commit changes to your code on your local computer to maintain a history of the progress of your programs.
Push (upload) your commits back to the remote repository so they can be accessed from any other computer (and by me).
We will do these things by entering specific commands in the terminal (via Powershell on Windows or Terminal on Mac).
But first! A point of clarification: The entire purpose of git is to handle keeping track of your code’s history. Every time you make a commit the code as it exists at that point will be saved. This means that you never have to save multiple versions of your code using different filenames: e.g. mycode_v1.py, mycode_v2.py, mycode_v2a.py, etc. If you are at a point that you made changes to your code and you want to make sure they are tracked, you simply need to make a commit following the instructions below.
Now let’s learn the git basics.
Linking your computer to GitHub
You only have to do this step once! Recently, GitHub changed the way that you can access your remote repositories. They now require the use of something called an SSH Key to allow uploading of your commits directly from your computer to your remote repo. So, we need to set that up.
In short, an SSH Key is a more secure replacement for a traditional username and password. On your local computer, you can create an ssh key pair. One of the pairs is called a private key, which is something that you keep on your local computer and never, ever share with anyone else, or any other computer. The other part of the pair is called the public key. This can be shared with anyone, and in this case, GitHub.
The way it works is this. The GitHub will have your public key, which includes information about your local computer, so that when you attempt to push code to GitHub from that computer, GitHub will recognize it and present it with your public key. Your public key is an encrypted message that can only be unencrypted by someone that has the corresponding private key. When you send code to GitHub, your computer will decrypt the public key and show GitHub the result, at which point GitHub will more or less say “yes, you are the person (computer) that is allowed access to this account on GitHub. Proceed…”
To summarize, the steps that you need to complete are:
Create an ssh key pair on your local computer.
Share you ssh public key with GitHub.
The process for doing this is pretty simple…. if you know what you are doing. As a starting point, see if you can follow the instructions here: https://docs.github.com/en/authentication/connecting-to-github-with-ssh
Note
For Windows users- in the instructions, you are told to “Open Git Bash”. Instead, you should use the Anaconda Powershell like you did above when installing git.
When following the linked instructions, on the page called “Generate new SSH key”, you should ignore the section titled “Generating a new SSH key for a hardware security key”. Also, when generating a SSH key, you will be asked for a passphrase. It is (somewhat) acceptable to leave your passphrase as blank. As long as no one else gets your private key!
In short, do add an ssh-key, start up your Terminal or Powershell, then execute the following commands:
cd .ssh/
sshkey-gen
follow the instructions to create a key pair. You can use the default naming or change the name as you would like. Enter a password for your keypair or don’t as you prefer. Once your key pair has been created, execute:
ls
cat "publickeyfile"
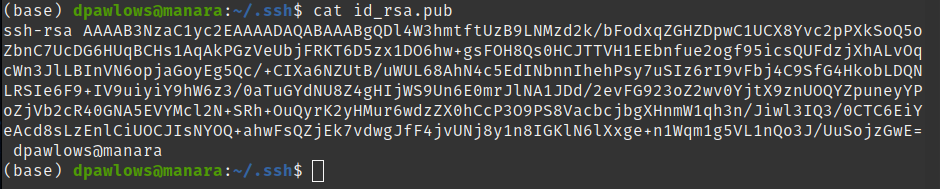
One of my public keys (id_rsa.pub). Yours may look different!
where “publickeyfile” is the name of your publickey (something like id_rsa.pub or id_ed25519.pub unless you changed the name). The ls command is used here to list the contents of the directory that you are working in.
Finally, copy the text that was produced by the cat command. You will paste that into a form on GitHub. Head to GitHub and click on your profile icon in the upper right corner, then select settings. Select “SSH and GPG Keys” from the navigation menu on the left. Then click on the green “Add SSH Key” button. Give your key a title (whatever you want) and paste your public key into the textbox and click “Add SSH key”.
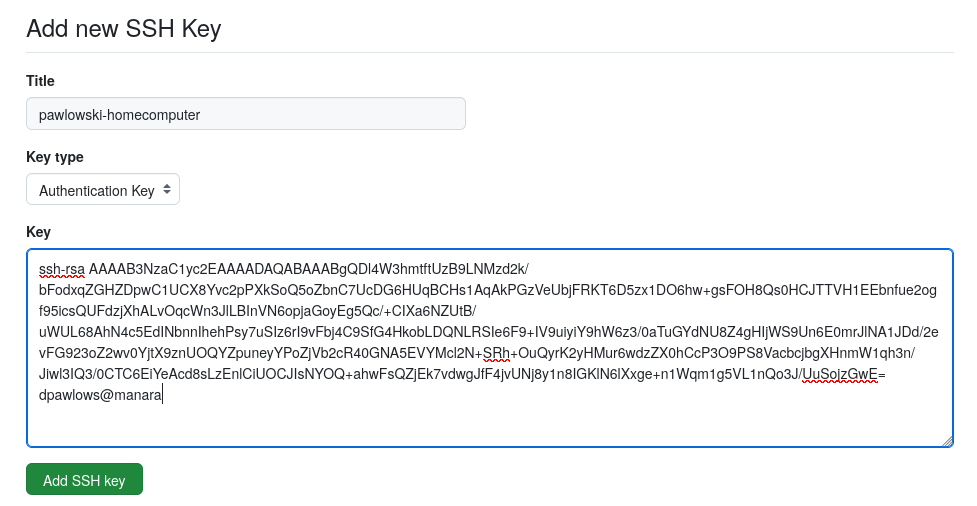
Adding a new ssh key to GitHub
I fully expect to work with many, or all, of you individually to help troubleshoot, so please don’t get frustrated by this process and reach out to me for help if you get stuck!
Once you have an SSH key installed, you should see it in the list on GitHub.

I currently have 4 public keys, which correspond to 4 different computers that can access my GitHub account.
Warning
Do not proceed until you are sure you have uploaded your public key to GitHub! Again, let’s have a meeting to get everything working!
Working directory
When you clone your remote repository from GitHub, it will be
downloaded to the current working directory (cwd) on your local machine: the
directory that you were
in when you entered the clone command. If you
don’t change directories, your cwd is
probably your “home” directory on that computer
(something like /Users/<username>/).
If you want to stay organized, you should change directories in the
terminal by using the
cd directoryname command, and then clone
to that directory. For example, I might have a
“Classes” folder in my home directory, and then a “Phy280” folder
inside that one where I keep all of my assignments. So, I would
enter
cd Classes/Phy280/
in the terminal to change my cwd to that directory.
Once you clone your repo (which you will do in the next step) to your local machine, you will then need to change directories to work on your project, execute git commands, etc. If the name of your project is “exercise03_dpawlows”, then you would enter
cd exercise03_dpawlows/
in the terminal to set that directory as your cwd. If you are not in the cwd that corresponds to your local repository, git will be very confused and the commands below will not work.
git clone
When you clone your github repository to your local machine, git will use three “trees” to manage your project. The first one is your working directory, which is simply the directory that contains your actual files. The second tree is called the index and is a staging area the keeps track of the files that you are ready commit to your local repository, but haven’t done so yet. The third tree is the head and it points at the last commit that you’ve made.
Let’s clone one of your GitHub repositories to see how all of this works. To do that, in the terminal, use cd to change directories to where you keep your Phy280 projects (for example, cd Documents/Phy280/). Then enter:
git clone link_to_remote_repository
where you need to replace “link_ro_remote_repository” with the actual address of your remote repo. You can find this by going to the GitHub in the browser and navigating to your repository there.

The URL for my exercise02 repo is https://github.com/emuphysics/exercise02.git
To get the link to the remote repository, click
on the ‘Code’ button. Make sure SSH is selected
and copy that address (should start with git@github.com:…) and
paste it in the terminal as part of the git clone
command. Hit enter and enter your GitHub credentials
if you are prompted for them.
This should result in a clone of your remote repository on your local computer that is located in a directory with the same name as your repository.
git workflow- the main commands
Once you have a clone of your code on your local computer, you can modify those files as needed. Then, you are ready to track your changes as part of the git workflow. First, add files to the staging area. Next, commit your code to your local repository. Finally, push those commits to the remote repository on GitHub. Using the terminal, the process is very straightforward. The 3 commands that you need to do all of this:
git add filename
git commit -m 'message'
git push origin master
The git add command will add the file called “filename”
to the index. You can use this command to add multiple
files over the course of a coding session before
moving on to the next step if you want. Again, the point of the index is to stage your commits so that
you can make changes to one file, add that file to the index,
and then work on a different file and not have to remember
what you were doing on that old file.
After you add one or more files to the index with
git add it is time to commit those changes to your
local repository using the git commit command.
You always want to include a message when making a commit
to let yourself and others know what changes you just
added to the project. After this command is executed,
the head will point at this latest commit.

The git workflow
Finally, when you’ve made all of your commits and
are ready to upload the code to GitHub so you can share
it with others or be able to access your changes
from a different computer, it is time to
use the git push origin master command. This will
push the changes that you’ve made to your local
repository to your remote repository (on github).
In this context,
origin is a shorthand name for the remote repository
that your project was originally cloned from. Master
refers to the branch that you are pushing changes to
(branching is a special feature of git and it is
awesome, but we wont be using it in this course).
If all goes well, you should see a bunch of output to the screen with a “Writing objects” 100% in there somewhere. Then, you can see that your changes have shown up on GitHub.
In summary, once you have cloned a remote repository to your local machine (you only have to do this once) the git workflow is this:
make changes to your code
git add filename(s)to add those changes to the indexgit commit -m 'message'to commit the changes to your local repogit push origin masterto push your local changes to your remote repo on GitHub
git pull
If your remote repository has changed and your local
repository is behind (this will happen if
I push changes to a repository that you have already cloned or if you work on multiple computers), you can use the git pull
command to pull (download and update) your local repo.
git status
Did you forget which files you’ve changed and which
you’ve added to the staging area? Did you
commit those changes that you were working on 2 hours
ago? These questions and more are answered by
the git status command. This command will tell
you what you’ve changed and what you still need to commit
so you always know where your files are at in the
git workflow. Use if often. But note, it will
not tell you if you’ve pushed changes to your remote
repository. You can use git diff master origin/master
to do that.
Summary
Using git and GitHub in the way described in this document may seem like a big pain when you were happily using the “upload” button just last week. I teach this method to you because the git command is powerful and can help you keep track of the evolution of your software in ways that using GitHub alone can’t. Once you get used to using the git commands in this way, it really does make syncing your code with GitHub faster and more seemless, and your workflow more efficient in general. This is standard practice in most fields that do software development, including physics and astronomy.
Issues
Chances are, you will do something, sometime, and either your commit or push will not work as expected. It happens. Figuring out what went and how to fix it really takes experience working with git because each case is different. So, for our purposes, I want to give you the secret trick to fixing all git issues.

Seriously, do this. [source: xkcd.com]