Anaconda basics
The Navigator
The Anaconda package that you installed comes with several different tools to help you be an efficient programmer. To get started, launch Anaconda Navigator from the Start Menu on Windows or from the Finder on Mac. Once the Navigator is started, you will see something like the image below:

Anaconda Navigator startup screen
where you can choose which tool to work with. JupyterLab and Jupyter Notebooks are web based tools for integrating Python code with human readable text and graphics. You may use these tools in other classes, or as a way to keep your code and documentation organized. In this lesson, we are going to start with an introduction to Spyder.
Spyder
If you haven’t already, launch Spyder to get started.
Note
You can quickly launch
Spyder by typing spyder in the Command Prompt (windows)
or Terminal (Mac).
Once Spyder is up and running, you should have a window that looks similar to this:

Spyder IDE
The IDE is made up of a toolbar and 3 main panels: the editor, console, and help.
The toolbar
Provides quick access to standard computer application tools used such as creating new files, opening and saving files. Other tools are for running and interacting with code (e.g. the big play button runs the file that is currently loaded in the editor).
Editor
A basic text editor for creating and editing python code.
Help
Panel that helps to understand what your program is doing. As part of the Help panel, there is a toolbar that allows you to switch between the “variable explorer”, “plots”, and “files”. These tabs allow you see different things after you run your program: the variables you have been defined and what they are defined as, any plots that you’ve created, and files in your current working directory
Console
Sometimes referred to as the spyder command line. Area for entering commands, seeing program output, and interacting with your code. It is also possible to run your code from the console. The console interprets python code, which means that, generally, anything that you could enter into a file as part of a larger program can also be entered in the console. This is great for testing code that you want to include in a main program.
A side effect of all this is you can use the console as a calculator to do some quick calculations. For example, type
print(24*60*60)
in the console and press enter to remind yourself about the number of seconds in day.
Note
The Spyder IDE isn’t the only Python IDE available. However, most IDEs have a similar layout and options. So if you learn one, you will be able to work in other environments.
Tying it all together
Spyder is a development environment that is meant to make writing, editing, debugging, and running python code as easy as possible. In reality, it isn’t necessary to use Spyder to do any of these things. Instead, one can write and edit code in any text editor (e.g. VS Code, which is what I use, or Notepad/Textedit (not recommended)), then run the code from the Windows Powershell Prompt or Mac Terminal. In fact when you use Spyder, it is really just acting like a wrapper to put all of this functionality in one place.
To that end, there is some basic computer operations stuff that you need to understand to use these tools effectively. One of those things is the concept of the filesystem and the directory structure on your computer. When you write some code in the Spyder editor, that code gets put in a file on your hard drive. So, when you “run” that file, your computer has to know where to find it. There are a few different ways to get your computer this information, but the easiest is to make sure that you are working in the same directory as the file.
Current working directory
This is called setting the current working directory, or cwd for short. When you started Spyder for the first time, Spyder provided you with a file in the editor so that you could start writing code immediately. It called that file temp.py and stored it in a certain directory in your filesystem. You can tell which directory that is by looking just below the toolbar. The line that starts with the slash (/) in the image below tells us the file path (or just path for short). The path tells me the directory that the file is in as well as the name of the file itself. So, in this example, the file, temp.py, is in the directory /Users/dpawlows/.spyder-py3/ on my filesystem.
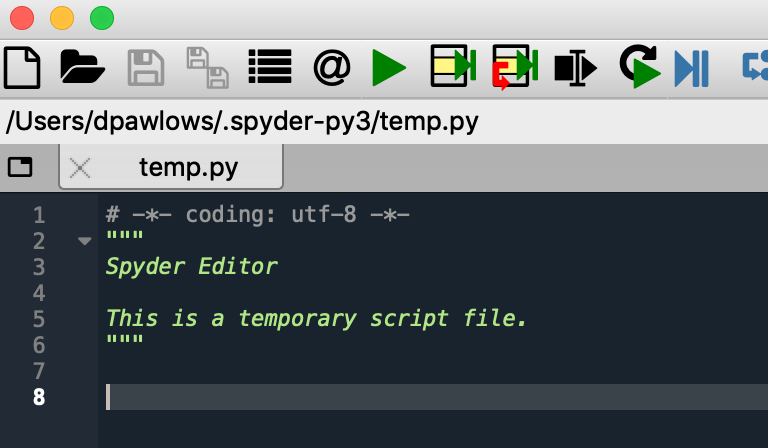
Note that the path is system dependent. I work on a Mac so it will look different if you work on a Windows computer. Also, dpawlows is my username on my computer. So, that will be different no matter what.
If I want to run this file, I should make sure that I am working in that directory. How do I know what directory I am currently working in? On the right side of the toolbar there is a dropdown dialog with a directory path in it.
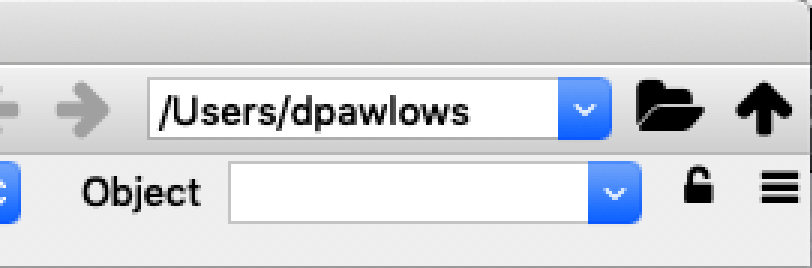
The current working directory (cwd)
The currently displayed directory is the cwd. Note that you can change the cwd by selecting a recently used folder from the dropdown or selecting any folder in your file system by pressing the black folder icon next to the cwd dropdown. You will need to change the cwd when you want to execute files that are stored in a different location on your hard drive.